Fur on deer hide tanning (PICTRE HEAVY)

  • Hey Guest, Early bird pricing on the Summer Moot (29th July - 10th August) available until April 6th, we'd love you to come. PLEASE CLICK HERE to early bird price and get more information.

TurboGirl

Bushcrafter (boy, I've got a lot to say!)
Sep 8, 2011
2,326
1
Leicestershire
www.king4wd.co.uk
I've been lucky enough to be offered a hunting freinds 5 deerskins, freshly shot with the hides and heads removed :) I collected them today and here they are...
418769_2882784703162_1066438695_2929381_1780887775_n.jpg


Theres 3 heads and 5 hides so I'll make up the difference in brain quantity with eggs (6 whole +3 yolks per skin so I'll need 18 in total).
421032_2882785943193_1066438695_2929384_1983958567_n.jpg


The fleshy undersides are really fresh, all the flesh and the membrane need removing.....
405192_2882786863216_1066438695_2929386_1027569153_n.jpg


First job was to remove the brains from the heads. My yard axe and a good heave was sufficient to get a couple of fingers in to the spinal opening after it was pulled apart some, then the brains were easy to scoop out.
430638_2882788143248_1066438695_2929388_1260279005_n.jpg


Now I have a good idea of the sizes of a deerskin (I tell ya, a REAL noob ;)) I could raid the kindling pile for some battoning to make some rough frames. When the skins are on, I might need to lash them to a more substantial frame when I'm working the skins hard. (EDIT- these were'n't nearly man or big enough for the job, they stretch to about double their size when stretched & worked!)
428960_2882789343278_1066438695_2929390_1771398857_n.jpg


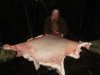
I've fleshed 2 so far this afternoon- not well but I want to get them all done fairly quickly and brains on so I can win some time with so many to do.
431076_2882790023295_1066438695_2929392_283223819_n.jpg


So the picture above is about 1/2 fleshed- I've got the occasional nick in em which will be sewn over the weekend (amazing really as anyone who knows me and my knife will know, we ain't the sharpest in the woods!)

I'm thinking I'll Egg & Brain the ones I've done and fold them flesh side in while I flesh the others in the woods this weekend :) I might try fleshing them on the frame to see if theres much difference, then work in the Egg & Brain whilst still framed. I've made notes from Cyclingrelf and Dogwoods posts but its all wing and a prayer stuff :)
 
Last edited:

TurboGirl

Bushcrafter (boy, I've got a lot to say!)
Sep 8, 2011
2,326
1
Leicestershire
www.king4wd.co.uk
Well, according to Cyclingrelf, eggs... she's done a lovely thread about tanning sheepskins with them :) or you can use alum or a variety of chemical jobbies, I like the natural way tho, mostly because I'm tighter than a gnats chuff ;)
 

Buntybunny

Member
Nov 24, 2008
12
0
Suffolk
Hi chuck loads of rock salt on the skins - quick! Put heads in brine - gives time to think! Have a few hides I cured and dried, tan different to sheep, calf, goat as hairs are hollow. No expert but I know a lady that is and a company that produces products for tanning deer skins. How exciting, good luck! Regards BB
 

PatrickM

Nomad
Sep 7, 2005
270
16
Glasgow
www.backwoodsurvival.co.uk
One hide is quite an undertaking if you have neved tanned before - five is a mamoth task, couple of pointers if you want.


Put brains in seperate bags and freeze them - you can use when needed, they will sour very quickly if you do not.


Deflesh all hides as quickly as you can - be methodical - any fat will go rancid and decay will cause hair to slip.


The hides are easier scraped on a beam.


Don't use your knife - if you have to - use the back of it.


Make a robust frame - there is a lot of tension and stress when the hide is being stretched and dried, more when you begin the softening process.


String up and stretch out on a frame and leave to dry - away from any insects and foxy dogs.


Once they are all dry you can dry scrape them next year if you want.


Concentrate on one hide at a time, before braining remove completely the hypodermis/papillary layer with a sharp tool (not your knife) and not just the loose fibers,
this is important for a number of reasons (brain penetration, softening etc) You want to scrape it down to the dense fibres of the dermis layer - once this is achieved
lightly abrade with a pumice stone.


If you do not want hides that resemble hairy cardboard be methodical at every stage.


PS. be methodical at every stage and as they say in Scotland "never hurry a Murray" - take your time.:)
 

TurboGirl

Bushcrafter (boy, I've got a lot to say!)
Sep 8, 2011
2,326
1
Leicestershire
www.king4wd.co.uk
Well, what a load of amazingly good advice I've come home to!

I'm back from a weekends worth of hard woodland work- I've got 2 fleshed and brained (one was brain and egg) and 2 further hides just fleshed, the last hide as yet unstarted. Its good its been cold in some ways as its bought me some time (and nice thick fur hides, o'course) but the downside is that it made the fat very stiff for fleshing and the hides are very cold and claggy to work- they just didn't dry outside at all, despite the rain holding off.

I framed my first fleshed hide after sewing up the holes (many of which I'd caused with incautious knifework fleshing, I'm embaressed to admit)- I used cotton crochet yard pulled through wax.
426532_2905181663072_1066438695_2939932_1229100454_n.jpg


As I lost the light, my next picture is from the next morning- I'd framed it then used brain & egg to rub in vigorously, using the heat from the tipi stove and just keeping on working it for blooming hours... it really was extremely dissapointing to see it looking like this the next day!!
407975_2905182623096_1066438695_2939933_1249381177_n.jpg


Next day, I half fleshed the fallow skin on a log, using a knife adaption suggested by Chad which worked really well- simply forcing the tip into a piece of wood to use as a handle. You can see it on the top of the wood :)
407306_2905184943154_1066438695_2939936_907688211_n.jpg


As the frames I'd made were woefully small and weak, Clive kindly set me up with a living frame near the communal fire so I could continue fleshing with the happy craic in the background- twas brilliant to have the moral support and advice of everyone, MUCH appreciation!! So here's the hide being holed with the marlin spike- worked real well pushing into the soft soil.
429210_2905185703173_1066438695_2939937_710730393_n.jpg


Here's the fallow partially fleshed on the frame- it was hard using the knife on it compared to the log beam, the axe head or an adze, mattock or flint head would have been better options.
397930_2905188223236_1066438695_2939940_762963833_n.jpg


And the fur side of the fallow when spread out-
419149_2905189663272_1066438695_2939942_1383879541_n.jpg


I didn't add much warm water to the brain paste and it went in well- maybe 3 or 4 applications for the whole brain to soak in then kept on working the skin with the rib burnisher. Unfortunately as it was cold the skin wasn't going to dry at all so we unframed it and pulled it between 3 of us (cheers, Clive and Spud!!). Working a cold, claggy hide was distinctly unpleasant but we kept at it for 15-20 mins or so, turning it a little each time- you can hear the creaking as the fibres split, reducing as it becomes more evenly worked :)
395304_2905190983305_1066438695_2939943_1464087916_n.jpg


Having one hide being brained allowed me to get some production going with a fleshing hide so I could alternate between them much more efficiently.
422697_2905192143334_1066438695_2939945_1554709946_n.jpg


Thanks to everyone for your interest and encouragement, particularly the North Woods meeters who have been so supportive and understanding :)
 

sasquatch

Bushcrafter (boy, I've got a lot to say!)
Jun 15, 2008
2,812
0
47
Northampton
5 hides is a ridiculous amount of work, fair play for taking on such an epic task! I think it's safe to say you put more work in than anybody all weekend. I hope they turn out a treat, I'm sure they'll be grand on completion.
 

cowboy

Banned
May 3, 2010
1,941
0
The shire
Good job TurboGirl, have you got any plans for the pelts ones they have been cured? or are you planning on making one big rug? ;)
 

TurboGirl

Bushcrafter (boy, I've got a lot to say!)
Sep 8, 2011
2,326
1
Leicestershire
www.king4wd.co.uk
Well, the hunter wants one as a wallhanging and I think the other hunter should have one as a seat cover for his car... I might use tothers for chair covers if I get round to making hammock chairs for the front room :) Got to go flesh the last one now, its a permanent round of working a rotation of hides and getting distinct grief from the family :/ Can't wait till they're dried and therefore don't smell as much- hopefully!- then I can smoke em and concentrate on one at onces as Patricks sensibly suggested :)
 

TurboGirl

Bushcrafter (boy, I've got a lot to say!)
Sep 8, 2011
2,326
1
Leicestershire
www.king4wd.co.uk
Well, I'm getting to try some tanning in the comfort of my mid-decorating workroom, to the utter mortification of HWMBO... he may have a point ;)....
418734_2916201538562_1066438695_2943186_680450305_n.jpg


Apparently they smell like either fish or nonspecific dead and he refuses to eat a meal prepared in the same house, which means I get to go on BCUK instead of cooking ;)

Anyway they're looking nice but feeling boardlike, not a big problem as they'll be either wall rugs or seat bases. They look great framed up from the front....
396690_2916202338582_1066438695_2943188_1218721748_n.jpg


The fallow will be a wall hanging for the hunter, I hope :) But the rears don't look so good tbh, I don't think I'm working them enough- you can see the areas going white which seems to be working better.
401469_2916203178603_1066438695_2943189_2042826451_n.jpgg


Martin got a nice shot of the pulling technique Clive suggested prior to reframing, bit of a three way thing where you put pressure until it stretches, gradually moving around the hide. The fingers were feeling very cold after 15mins but the smell of dinner cooking on the fire is a finnnne motivator ;)
403298_2916204178628_1066438695_2943190_158609007_n.jpg


I now need to get them dry which I think will stop them smelling but they are very parchmentlike- can I smoke them and then wash them before a final beaming, d'ya reckon?
 

Attachments

  • 403298_2916204178628_1066438695_2943190_158609007_n.jpg
    403298_2916204178628_1066438695_2943190_158609007_n.jpg
    27.2 KB · Views: 14
Last edited:

joe o

Member
Feb 14, 2011
29
0
Wiltshire
Like someone else mentioned, well done for taking on five at once! In my experience, now that they've been fleshed completely they must be well stretched in a frame to dry before scraping off the fine membrane from the flesh side. Brave of you to dry them in your house but I've done exactly the same during the winter months, also in an un-decorated room with quarry tiles on the floor and an open grate fire (lots of apple and cherry wood logs on there in an effort to over shadow the musty death smell from the hides). You won't want to force dry them too fast but as long as they've been well stretched in a frame with fairly frequent lace holes, you should be able to minimise the furry pork scratching effect of any sagging, fleshy parts around the border (chances are you'll snip the border off anyway). From the pics I would say you'll get a better, larger hide if you can increase the number of lace holes and the size of the frames.

Once dry, the smell should fade and they can be stored indoors for ages without any worry of the hair slipping. If they get wet again, decay of the epidermis will begin and you could get hair slippage. Best thing is to scrape the papery membrane off with a right angled scraper (like a bluntish, flat hand adze). Comes off like sunburnt skin peelings (if you like that sort of thing...). The hide will be almost a matt white underneath. If they're really dry and crispy be careful with your scraping or you'll slice through completely. In any slightly dodgy areas I use a rough sandpaper on a dense foam block to get down to the white layer, in fact I'll go over the whole hide with rough sandpaper before egging/braining to give a more porus surface to accept the braining mixture. De-clog the sandpaper with a small stiff brush to make the same piece last longer. Winter hides could well be fattier which will be better scraped off as much as possible before sanding. I once nearly broke an electric sander trying to clean up a couple of reindeer hides...

Braining/egging (12 eggs for a fallow) is the traditional method for softening the skin but there are other ways. I have heavily smoked a large red deer hide after membraning and just rubbed in neats foot oil and I leave the thing out in the workshop all year round with no stiffening or rot setting in. It's heavy but flexible like a large hairy treated canvas tarp! For braining/egging, slightly dampen the flesh side first or you'll get un-even absorbtion. Don't leave it damp for too long or there'll be a risk of hair slippage. It's not as easy to wring a hair on hide before drying but then again, you'll only be rubbing the eggy/brainy mixture in by hand to the flesh side rather than soaking the whole thing so you should be able to 'squidgy' a lot of the mix out with an old towel.

String it back up in the frame and set aside a day per hide for poking and prodding the fibres with a wooden pole carved to a chisel point to stretch the fibres as it dries. I'm not sure I would attempt to hand stretch a hair on fallow hide, even in the summer! At least with frame stretching you can nip off and get a cup of tea and your knuckles should still have skin on them at the end of the day. Once you feel it's dry to the touch, soften up any stiffer areas with sandpaper/pumice stone and smoke it to smithereens. I would even be tempted to smoke your hides before the egging process to give them a head start and help preserve them while they wait to be worked, dried and softened. A good smoking does wonders for preserving a hide, whatever stage it's at in the tanning process. Be wary of washing the hides too much, certainly before they've been smoked, as over wetting can cause the hair to slip. Brush the gunk out where you can and carefully spot clean any really bloody areas after the smoking process. For smoking, if you're a regular at meets and there's a parachute canopy up then you can hoist them up above the smoke ceiling, flesh side facing down to smoke over the whole weekend (saves a lot of work). Before turning in for the night, after the parachute camp has been vacated you can dump a whole load of punky birch and dead leaves on the embers then run for it. The parachute will fill with choking smoke but your hides will go a lovely buff colour! Other than that I'd join two hides to make an enclosed sack (hair on the outside) and pump the smoke into it through a pipe/chimney. Most of the smoke will permeate through the hide sack to escape ensuring they get thoroughly preserved in the smoky chemicals.

I've always fancied using dotty fallow for a hooded parka. I reckon it'd look amazing (but don't wear it during the rut...)

Good luck

Joe
www.wilderness-survival.co.uk
 
Last edited:

TurboGirl

Bushcrafter (boy, I've got a lot to say!)
Sep 8, 2011
2,326
1
Leicestershire
www.king4wd.co.uk
Ohhhh yes, the more, the merrier :) Joe, and all other contributers, I really appreciate your input!! Although I am VERY jealous of your fireplace in the workroom, what a fabulous aid to smell removal and drying :)

I'm now at the stage that the hides are all fleshed, 3 have had their tanning mixtures soaked and stretched in (3 brain, 1 brain & egg mix and the last one has been tanned in the washing machine today.... stealth mode enabled so HWMBO didn't catch me at that one ;) ) - this one has yet to be framed (and Joe, I will be putting it on a bigger frame fo'sure, it was silly of me to continue with the small ones, they really made the job hard and have distorted the hides a bit). I've unframed the others as they're nice and dry but I've yet to give them a good going over with sandpaper/ pumice.

I'm happy that they do fold ok although they've not been worked as well as they could- I'm hoping that when they're washed after a good smoking, I'll be able to concentrate on them individually and get a better final finish.
401122_2924998678485_1066438695_2946283_664361521_n.jpg


The back of the first 4 hides are fully dry now and a lot pleasanter to be around ;) I'll just stick the one pic up as they're very similar...
396696_2924995078395_1066438695_2946279_1726492392_n.jpg


And a daylight pic of the furry side, I'm really pleased at how well the hair is holding- I think its a combination of getting on with em kwik, the cold weather keeping them standing fresh for longer and not having had them in any contact with water (I presume thats a benefit of tanning from fresh)
406557_2924994078370_1066438695_2946278_447524414_n.jpg


I quite like the saggy 'sows ears' bits, I've chopped areas off that were minging but not trimmed back too hard as I think as wall rugs, the curly bits look pretty cool :)

So I think I'll have a bit of a break for a few days, catch up on some valeting and pressing jobs, then I'll be setting up the tipi and using that to smoke 'em when they're all dried at the next nice high pressure weather break :)
 

BCUK Shop

We have a a number of knives, T-Shirts and other items for sale.

SHOP HERE