Making you own bow the old fashioned time honored way is one of the things that many of us have on our list of things we want to do as Bushcrafters. I was lucky enough to get a place on one of the best bow making courses around, with the Forest Knights in West Sussex, and this is a review of the course. The course ran over 3 days which for me was the Friday, Saturday & Sunday of the August Bank holiday 2012, so was last weekend at the time of writing. The goal was to convert a large chunk of wood into flat bow, which bent evenly along both limbs & was capable of firing an arrow over 100 yards. The course includes how to make the string, using the Flemish Twist method to create a multi strand bow sting using Dacron threads & bees wax. We also covered the fundamentals of arrow making, before going on to fletch some arrows that we later shot.
The course was held in the grounds of the Amberly Working Museum, on the beautiful South Downs near Arundel in West Sussex, where the Forest Knights have a woodland bow workshop in the Forest Crafts section of the museum. There were 3 of us students on the course, with 2 instructors with us for the 3 day course, which meant we had near enough one on one instruction for the whole course. The instructors for the were Wayne Jones, the founder of Forest Knights, who has many years bow making experience amongst his many other skills. We also had the privilege of being taught by Dave Sinfield, a very experienced bowyer and archer, with many years of experience behind him. Here is an overview of the course.
Day 1: From trunk to plank
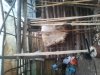
Our bow stave blanks were 7 foot sections of beautiful American Ash that Forest Knights had chosen for us to make our bows from. That had been felled some weeks before & had been split into 1/8ths sections, which were roughly 6” across the face & 8” deep. We had a good choice of staves, as there were several spare in case we messed one up, which can be easily done if you don’t pay attention. Here is a picture of one of the staves we started with:

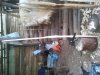
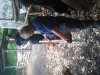
Reducing a bit of wood that big down to the a roughly bow shaped plank 3" by 2" was the job of the first day. That meant taking a LOT of wood off the sides & the back but without damaging the front too much, as that would become the face of the bow where a lot of the power comes from. One wrong cut into the face of the bow & you would have to throw it away to start again. The process starts with running a string down the face of the bow stave to mark off a centre line, by marking the a line at each end & in the middle of the stave. This is crucial to the whole process as the dimensions of the bow are determined where the centre line is. A lot of Axe work later & we ended up with something that started to look like a bow:

It is hard to describe just how many hours of axe work, measuring, sawing & shaping went into that first day to get that roughed out bow out of the huge piece of wood we started with. I had certainly never done as much axe work in a day & there were plenty of blisters & sore hands at the end of it.
The course was held in the grounds of the Amberly Working Museum, on the beautiful South Downs near Arundel in West Sussex, where the Forest Knights have a woodland bow workshop in the Forest Crafts section of the museum. There were 3 of us students on the course, with 2 instructors with us for the 3 day course, which meant we had near enough one on one instruction for the whole course. The instructors for the were Wayne Jones, the founder of Forest Knights, who has many years bow making experience amongst his many other skills. We also had the privilege of being taught by Dave Sinfield, a very experienced bowyer and archer, with many years of experience behind him. Here is an overview of the course.
Day 1: From trunk to plank
Our bow stave blanks were 7 foot sections of beautiful American Ash that Forest Knights had chosen for us to make our bows from. That had been felled some weeks before & had been split into 1/8ths sections, which were roughly 6” across the face & 8” deep. We had a good choice of staves, as there were several spare in case we messed one up, which can be easily done if you don’t pay attention. Here is a picture of one of the staves we started with:
Reducing a bit of wood that big down to the a roughly bow shaped plank 3" by 2" was the job of the first day. That meant taking a LOT of wood off the sides & the back but without damaging the front too much, as that would become the face of the bow where a lot of the power comes from. One wrong cut into the face of the bow & you would have to throw it away to start again. The process starts with running a string down the face of the bow stave to mark off a centre line, by marking the a line at each end & in the middle of the stave. This is crucial to the whole process as the dimensions of the bow are determined where the centre line is. A lot of Axe work later & we ended up with something that started to look like a bow:
It is hard to describe just how many hours of axe work, measuring, sawing & shaping went into that first day to get that roughed out bow out of the huge piece of wood we started with. I had certainly never done as much axe work in a day & there were plenty of blisters & sore hands at the end of it.
Attachments

Last edited:


")